
All help topics
Help topics
- Getting Started
- Sales & POS
- Products & Inventory
- Purchases & Suppliers
- Customers
- Staff & Permissions
- Reports
- Branches
- Hardware
- Payments
- Settings
- Troubleshooting
- Billing & Subscription
- Workshop
- Training
- Sales Agents
- Laundry
- Accounting
- HR & Payroll
- Hotel
- Services
- Communication Center
- Online Store
- CRM
- Restaurant
- F&B Manager
- Production
- Projects
- Asset Management
- All topics
How to Set Up Your Business for the First Time
Open Settings → Business Settings and check your business name, currency, time zone, date format and logo on the Business tab, then your tax, product and POS tabs. Check your shop under Settings → Business Locations, and work through the Getting Started checklist on your home page.
Your business was created when you signed up, with sensible defaults. Spend ten minutes checking these settings before your first sale, so receipts, prices and reports come out right from day one.
Step 1: your business details
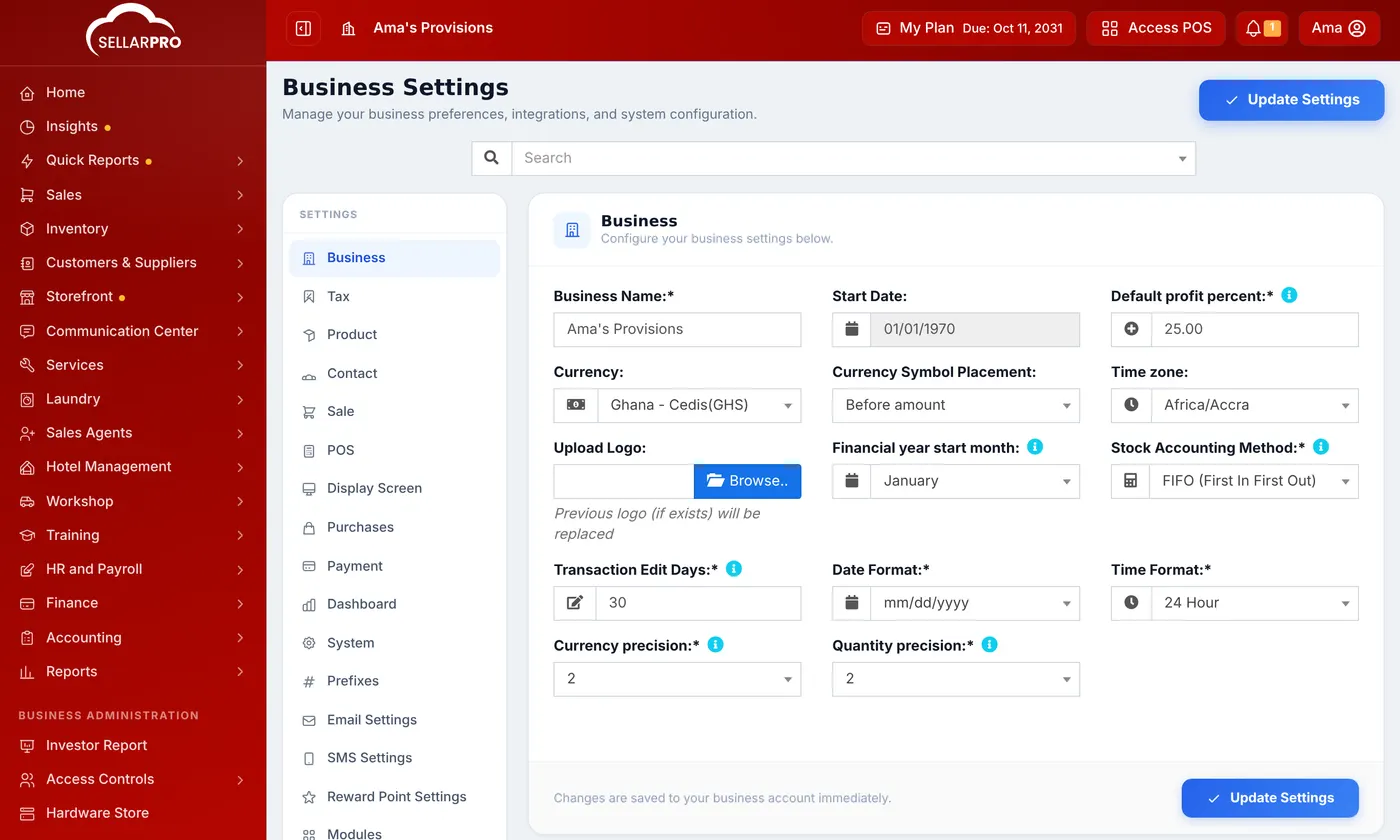
- Open Settings → Business Settings. The Business tab opens first.
- Check the Business Name. It prints on every receipt and invoice.
- Check the Currency, Time zone and Date Format. A wrong time zone puts late-evening sales on the wrong day.
- Under Upload Logo, add your logo.
- Set the Default profit percent: the margin SellarPro suggests when you type a purchase price for a new product.
- Click Update Settings.
Step 2: the other tabs
The tabs down the side group everything else. The ones most businesses change at the start:
- Tax: your tax numbers. Add the rates themselves under Settings → Tax Rates. See How to Add Tax Rates.
- Product: SKU prefix, whether you use expiry dates, and units.
- POS: how the selling screen behaves. See How to Choose Your POS Settings.
- Modules: switch on the features your business uses, such as Purchases, Expenses or Laundry.
Step 3: your shop
Open Settings → Business Locations. Your first shop is already there. Click Edit to check its address and phone number, which print on receipts. To add another shop or a warehouse, see How to Set Up a Second Branch.
What next
Follow the Getting Started checklist at the top of your home page: add products, customers and staff, make a sale and set up payment accounts. See How to Use the Getting Started Checklist.
Common questions
Can I change my business name later?
Why do yesterday's late sales show as today?
Was this article helpful?
Thanks — your answer helps us improve this article.
Still need help?
Can’t find the answer you’re looking for? Our support team in Accra can help.