
All help topics
Help topics
- Getting Started
- Sales & POS
- Products & Inventory
- Purchases & Suppliers
- Customers
- Staff & Permissions
- Reports
- Branches
- Hardware
- Payments
- Settings
- Troubleshooting
- Billing & Subscription
- Workshop
- Training
- Sales Agents
- Laundry
- Accounting
- HR & Payroll
- Hotel
- Services
- Communication Center
- Online Store
- CRM
- Restaurant
- F&B Manager
- Production
- Projects
- Asset Management
- All topics
On this page
- Step 1: choose the customer
- Step 2: add the clothes
- Step 3: express, pickup and delivery
- Step 4: check pieces, the promised time and the date received
- Step 5: discount and payment
- Step 6: save and print
- Optional: add photos
- Common problems
- "A deposit of at least … is required"
- "Taking clothes in raises a sale…"
How to Take In Laundry and Print a Ticket
Open Laundry → New drop-off. Choose the customer, tap a price for each garment, describe each item and tap its condition tags, check the pieces count and promised time, take the deposit, and click Save & print ticket. The ticket prints with a customer copy and a shop copy.
Every drop-off becomes a ticket with its own number, a list of the clothes as the customer would describe them, and a sale for the money.
Step 1: choose the customer
- Open Laundry → New drop-off.
- In Find customer by name or phone, start typing and pick the customer.
- New customer? Click New customer, enter the name and mobile number and click Add customer. The mobile number is how they get their "ready" text.
Step 2: add the clothes
- Under Tap a price to add the item, tap the price for each garment and service. Use the search box to find a garment quickly.
- Each item appears under On this ticket. Use + and − to change the quantity.
- In the description box, write how you will tell it apart: colour, brand, marks. For example "white shirt, blue collar".
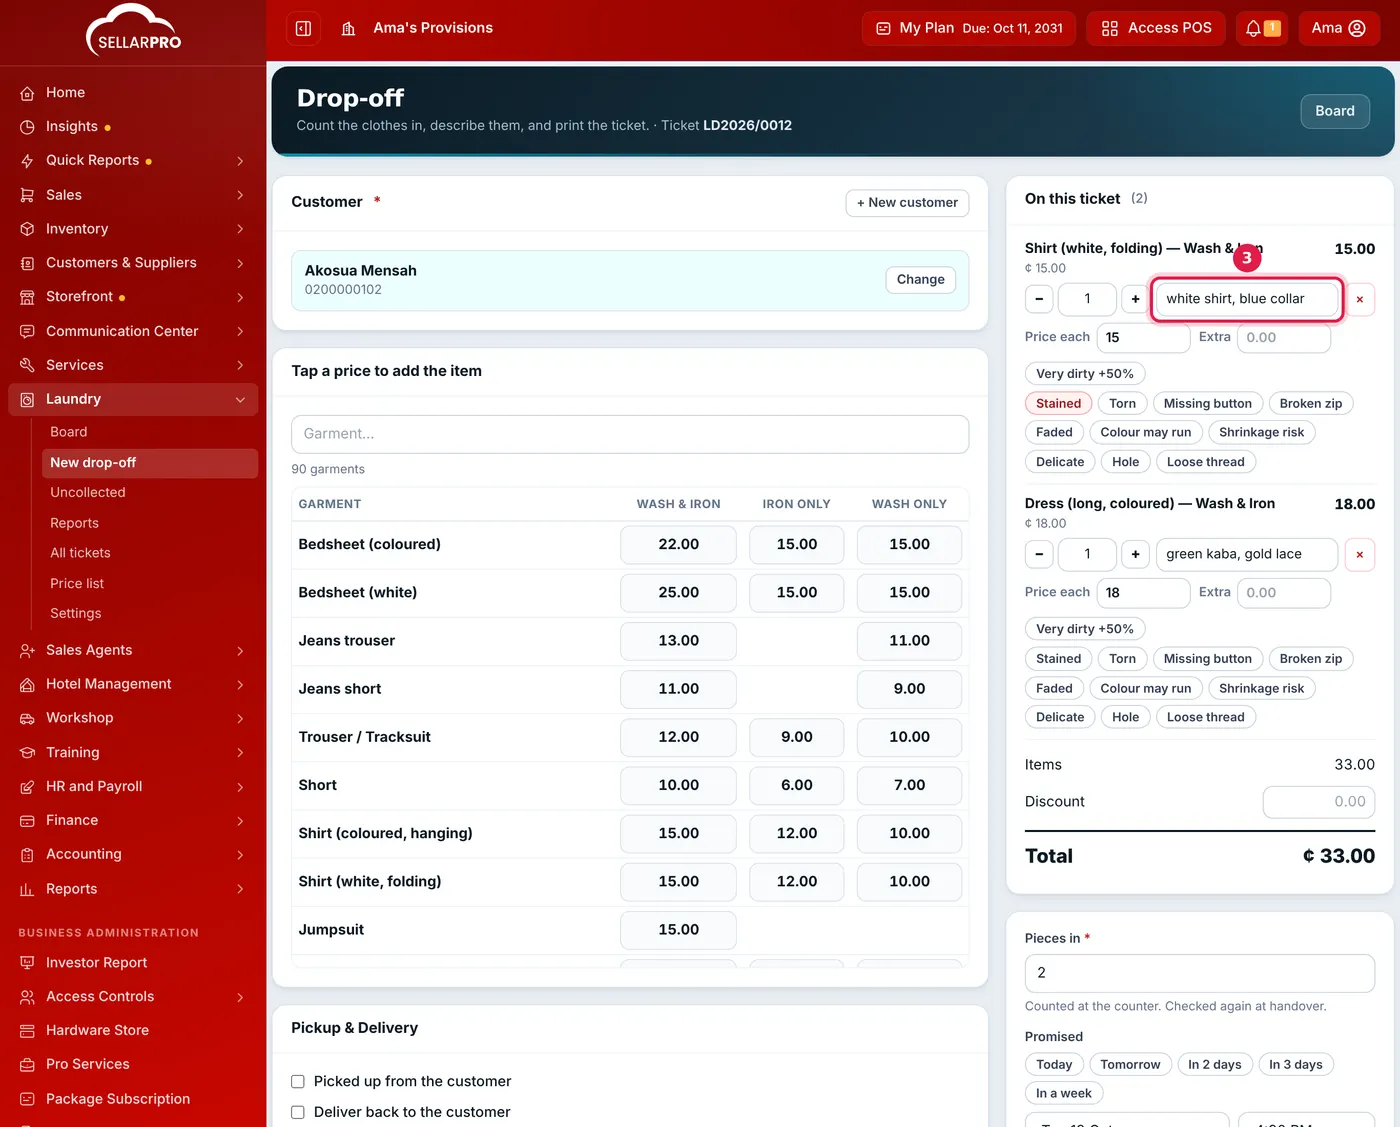
Each item gets a description and, where needed, a condition tag. - Tap any condition tags that apply, such as Stained or Torn. They print on the ticket, which protects you if the customer later says the damage happened in your care.
- For a very dirty or difficult item, tap Very dirty to add the suggested extra charge, or type an amount in Extra.
Two different white shirts? Once a line has a description or a tag, tapping the same price again starts a new line, so each one can be described separately.
Step 3: express, pickup and delivery
- Tick Express service (if you offer it) to add the surcharge and bring the promised time forward.
- Tick Picked up from the customer or Deliver back to the customer and enter the address. Your fees are added automatically.
Step 4: check pieces, the promised time and the date received
- Pieces in fills itself from the items. Correct it if needed: it is checked again when the clothes go back.
- Under Promised, tap a quick choice such as Today or Tomorrow, or pick a day and time from the lists.
- Date received is today. Writing up clothes that came in on an earlier day, such as tickets from before you used SellarPro? Pick that day instead. The ticket, its sale and any deposit are recorded on that day, so they appear in that day's takings and reports. If you have not changed Promised, it moves to count from that day. A day in the future is not accepted.
Step 5: discount and payment
- If you have permission, enter a Discount as an amount (not a percentage).
- Under Deposit now, choose the payment method and amount. The minimum deposit is filled in for you. Click Fully paid to take the whole amount. If your business takes tickets with no deposit, the amount starts at 0 and you can save without taking any money.
- Paying two ways, such as part cash and part MoMo? Click Add another payment. Add the MoMo transaction ID in Reference.
Step 6: save and print
Click Save & print ticket. The ticket opens to print, with a CUSTOMER COPY and a SHOP COPY, each listing the items with each one's unit price and line total, their descriptions and condition, the pieces, promised time, amount paid and balance. Reprint it any time with Print ticket on the ticket page.
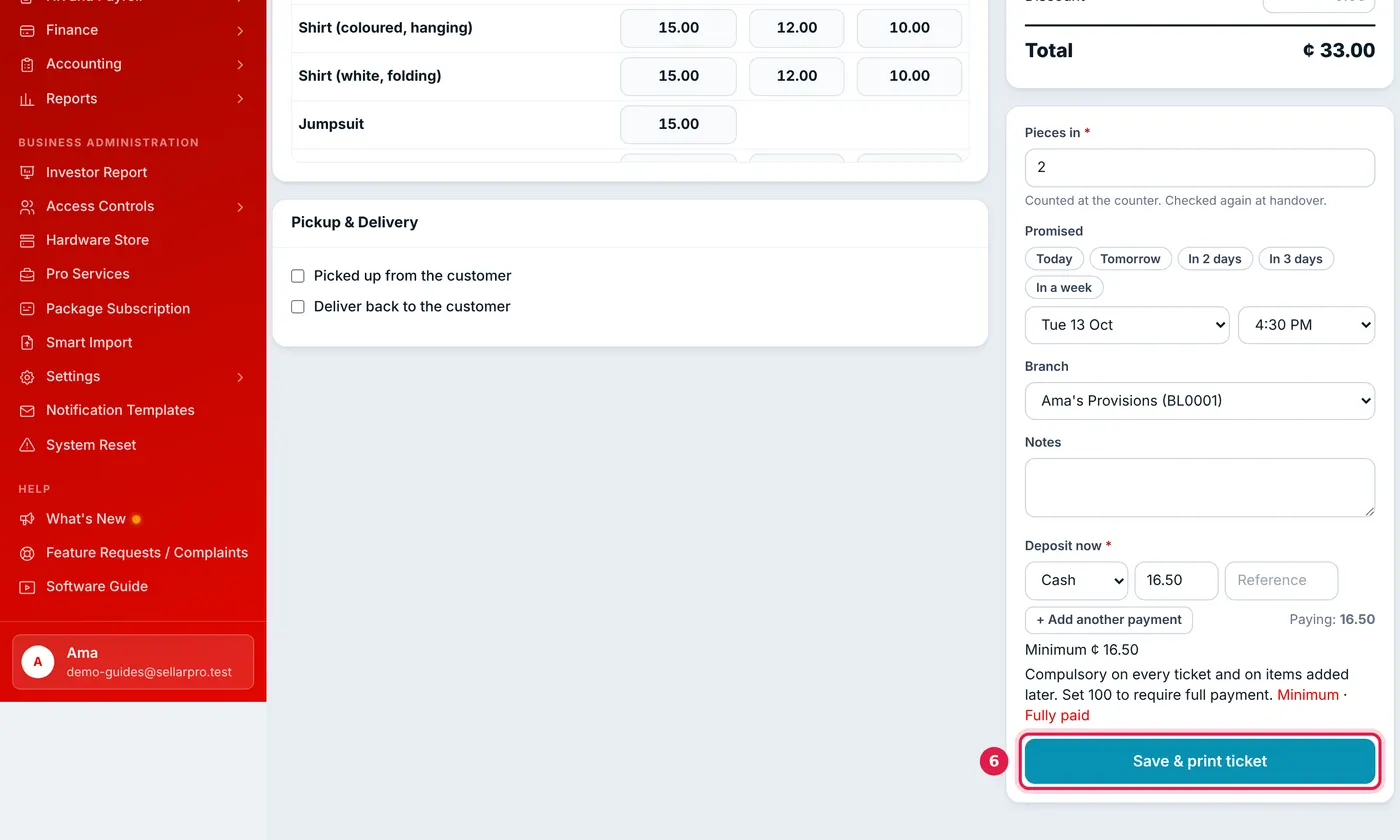
If customer texts are on, the customer receives a text confirming the drop-off.
Optional: add photos
On the ticket page, under Photos, choose pictures of stains or damage and click Add photos. On a phone, this opens the camera.
Common problems
"A deposit of at least … is required"
The amount paid is below your business's minimum deposit. Take at least the amount shown, or more. The owner can lower the minimum, or set it to 0, in Laundry → Settings → Deposit.
"Taking clothes in raises a sale…"
Your role needs the sales permission Add POS sell. Ask the business owner to add it under Access Controls → Roles.
Common questions
What if the customer pays more than the ticket?
Can I take in clothes without any payment?
What paper does the ticket print on?
Was this article helpful?
Thanks — your answer helps us improve this article.
Still need help?
Can’t find the answer you’re looking for? Our support team in Accra can help.